
Basic Pizza Dough
It’s been quite some time since I’ve posted, but I’m back! Just before the holiday madness starts, even though I feel like it’s already started.
As some of you may know, every year I take part in Movember at work and try to raise money for our team. If you’re not familiar with the Movember campaign, guys who participate will grow a mustache throughout the whole month of November and in turn are walking billboards for Movember and it’s cause because the creepy looking mustache is a conversation starter. Girls can also participate as Mo Sistas and the purpose is to help raise awareness for mens health and prostate cancer. I participate to not only raise awareness for mens health/prostate cancer, but to encourage a healthier lifestyle for everyone. Health can sometimes take a back seat to other things going on in life, but we owe it to ourselves and those around us, to be as healthy as we can and at least know what’s going on in our bodies. I’ve taken it upon myself to encourage my family, especially my husband and younger brother, to think more about their health before it’s too late. If you feel so inclined to donate to my Movember fund or even learn more about Movember, you can click here.
Now, obviously I can’t grow a mustache, so I try to come up with other ways to bring awareness to the cause and raise money. This is my fourth year as a Mo Sista, normally I’ll just do a big baking event either selling cupcakes or French macarons, but this year I wanted to try something different! I had several ideas, but I finally landed on a girls night out Wine & Pizza Party where I would teach them how to make pizza dough from scratch as well as provide a wine & pizza pairing.

Below are some pictures from the event, I wish I had gotten a big group picture, but I think we were all having too much fun I didn’t get a chance to gather everyone together.

![[Photo credit: @lesmerritt]](http://www.swanninthekitchen.com/wp-content/uploads/2015/11/IMG_0461.jpg)
![Wine & Pizza Pairing. [Photo Credit: @flowersbyb]](http://www.swanninthekitchen.com/wp-content/uploads/2015/11/IMG_0482.jpg)
![Action shot! [Photo Credit: @flowersbyb]](http://www.swanninthekitchen.com/wp-content/uploads/2015/11/IMG_0481.jpg)
![Some ladies patiently waiting for their pizza to finish baking [Photo Credit: @flowersbyb]](http://www.swanninthekitchen.com/wp-content/uploads/2015/11/IMG_0479.jpg)
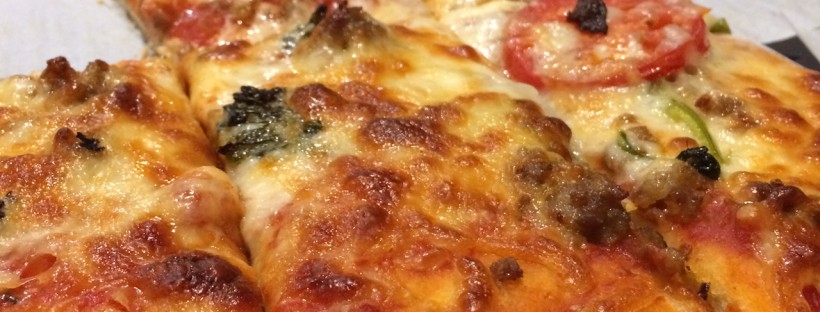
![Their finished product! Doesn't is look delicious?! [Photo Credit: @flowersbyb]](http://www.swanninthekitchen.com/wp-content/uploads/2015/11/IMG_0480.jpg)
I apologize not having step by step pictures of the process (hopefully I can update this at a later date with pictures of the process), but this pizza dough recipe is very easy to follow. Yes, there are more steps than dialing for delivery or opening up dough bought from the store, but sometimes it’s fun to get your hands dirty and make it yourself! We like to make pizzas as a little “date night” at home and crack open a bottle of wine. If you have little ones, it could be an event for the whole family! I’m sure they’d love to get their hands in there and help with the dough and choose toppings. Or get some girlfriends together and do what we did – have a girls night in making pizzas and sipping wine!
Just a few call outs to the recipe:
- For the flour, I like to use a mixture of equal parts all-purpose flour and bread flour. Sometimes when I want to feel not as guilty, I’ll add in whole wheat flour. You can really do any ratio of the flours. The bread flour will give the dough some crispiness and the all purpose flour will give it a chewier texture.
- When adding the flour to the yeast mixture, if you feel it is not coming together very well, add a tablespoon of water to help it out
- Sometimes to help the dough along with the rising process, I will pre-heat my oven to about 180-200 degrees before I get started and then place the covered dough in the oven, leave the door cracked and turn the heat off
- If you have a pizza stone, by all means use it! We like to use ours – be sure to place it on the bottom rack of the oven to ensure a nice cook on the bottom of your pizza. If you don’t have a pizza stone, you can also cook the pizza directly on the oven rack (on top of the parchment paper) – just gently slide it from the pizza peel or bottom of the baking sheet.
- I mention it in the directions below, but I’ll go ahead and mention it here also. If you’re cooking two pizzas at a time, rotate them between the racks halfway through the cooking time so you can get an even cook
- I’ll usually check our pizzas at 15 min and judge how much more it needs to go from there. Really, cook to your preferred doneness. Some of you will like a softer pizza, while others want it crispier.
Happy eating!
Basic Pizza Dough – By Hand Method
Adapted from recipe courtesy of Emeril Lagasse
Yield: 2 (12-inch pizzas) / Serves 4 people (or 2 hungry hungry people)
Ingredients:
- 1 package active dry yeast
- 1 cup warm water (110 degrees F.)
- 2 1/2 to 3 cups flour plus more if necessary (can use all-purpose, bread, wheat or combination of the 3)
- 1 1/2 teaspoons salt
- 1 1/2 tablespoons extra-virgin olive oil
- Parchment paper
Directions:
- In a large bowl, combine yeast with water, olive oil, salt and stir well to proof.
- After 5 minutes, add half of the flour and mix well with a wooden spoon or rubber spatula to thoroughly incorporate.
- Add all remaining flour except 1/2 cup and mix well with your hands.
- Think of a hook on a stand mixer and imitate that motion with your arm when mixing to bring the dough together.
- When the dough starts to come together, transfer it to a lightly floured work surface and knead dough for about 5 minutes – adding enough additional flour as necessary to form a smooth and elastic dough. If you feel the dough isn’t coming together easily, add a little bit of water. Dough should not be sticky.
- Transfer dough to a lightly oiled 2 or 3 quart bowl and turn to coat with oil.
- Cover with saran wrap and a dish towel and let rise in a warm place until doubled in size, usually at least 1 hour.
- After the dough has doubled in size, preheat your oven to 400 degrees F., divide the dough into 2 portions (for two 12-inch pizzas) and form into balls
- Transfer to a lightly floured surface, shape as desired and on a sheet of parchment paper, roll out to a thickness of 1/4-inch. Transfer the parchment paper with rolled out dough to a baking sheet and top with toppings of choice.
- If you are using a pizza stone to bake your pizzas on, transfer the parchment paper to a pizza peel or a flipped over baking sheet so you can easily slide the parchment onto the pizza stone
- Place baking sheet on the bottom rack of the oven and bake until crispy and golden brown, usually 15 to 20 minutes (depending on the toppings).
- If baking 2 pizzas at a time, be sure to rotate between racks half way through to ensure even baking
- If using the pizza stone, carefully slide the parchment paper with your pizza on it onto the pizza stone.
- Remove from the oven, slice and enjoy!